CASE 29: Re Revision of a intra-pelvic cup due to periprosthetic fracture using a custom 3D printed cup
The Story
“Revision hip surgery is challenging. There are times when it can fail immediately – and that’s what happened to Mitchell before he came to see me. With no choice but to offer further revision surgery, I realised that we might only get one attempt to get it right. A 3D-printed custom implant was our best chance.
Mitchell would need to have two operations and 12 weeks on bed rest, while we carried out CT scanning, planning and implant manufacture. He hoped it would be worth it.”
The Investigation
Mitchell was referred to the clinic at the age of 69, one day after his failed right hip revision surgery.
His initial presenting complaint (prior to the failed revision) was the sensation of something moving in his groin on the background of a right total hip replacement 20 years earlier. He’d had primary total hip replacement due to osteomyelitis and septic arthritis of his right native hip joint caused by tuberculosis. The components moving in his groin had led to a limp – and a lot of pain.
Infection was excluded following negative microbiological culture of a right hip joint aspirate.
The loose acetabular component was revised with exchange of the cup and liner using a 60mm cup and trabecular titanium augment with bone allograft. This dislocated the day after surgery. The sciatic nerve remained intact.
Due to the reconstruction complexities of this failed revision, he was referred to our service. He was comfortable at rest and neurovascularly intact.
The Evidence
Anteroposterior plain radiograph showing collapse of the acetabular bone around the cup one day post-operatively.
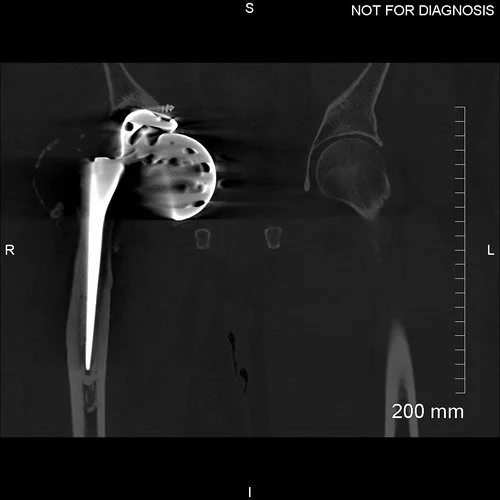
Coronal CT showing minimal bone around the acetabular component.
The Diagnosis
Mitchell had a failed acetabular revision and previous infection with complex anatomy requiring a custom acetabular component.
The Plan
We planned a two-stage procedure because the metal obscured the acetabular bone, which prevented an accurate CT reconstruction and increased the risk that the custom implant would not fit.
The first operation was to achieve removal of the implants from the pelvis and make Mitchell safe from intra-pelvic problems; better imaging of the pelvis following removal of the implants; and diagnosis and treatment of possible infection. The second operation was to fit the 3D-printed implant.
The Operation
The first stage of the operation was the removal of the femoral and acetabular components. This allowed for planning imaging to be taken.
The Outcome
Anteroposterior plain radiograph showing the girdlestone procedure with retention of the cement mantle.
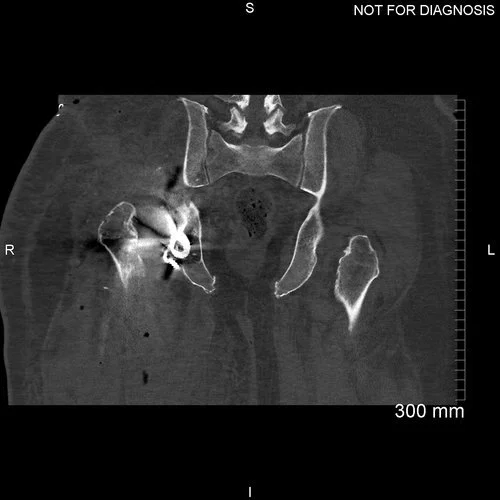
Coronal CT scan was used to plan the custom acetabular implant. Removal of the previous metal components allowed for better characterisation of the acetabular bone.
3D CT reconstruction showing the hemipelvic defect
Implant design showing the custom acetabular implant designed around this patients bony anatomy. The blue areas highlight regions of trabecular titanium.
The Second Operation
Implantation of the 3D-printed titanium acetabular implant.
We used a posterior approach through the old incision and noted extensive scarring around the hip and undertook the following steps:
Psoas and Gluteus Maximus tendons were released and the sciatic nerve was protected.
We prepared the acetabular bone, which involved reaming 60 and 62mm in two domes. The custom component was then inserted with good screws, as well as a dual mobility bearing.
An Exeter cement-in-cement femoral stem was used.
The surgical site was washed with savlon and normal saline and then closed with Ethibond, Vicryl and clips.
The Second Outcome
Anteroposterior and lateral plain radiographs showing a good position of the custom acetabular component and a well-cemented femoral stem.
EOS scanning at six-months after the second operation showed good positioning in the functional positions of sitting (with no stem-cup impingement) and standing (with equal leg lengths).
Coronal CT demonstrating an adequately seated implant with sufficient screws fixed to acetabular bone.
Anteroposterior and lateral plain radiographs taken 9-months after Mitchell’s operation. There is no radiographic evidence of any implant migration and Mitchell was happy with the result in clinic.
The Verdict
“Poor acetabular bone stock that is obscured by metal components (socket, augment and head) should be considered for a two-stage procedure.
In Mitchell’s case a custom-made 3D implant was the answer. He made a good recovery with no complications and is now walking comfortably.”


