CASE 38: Revision for infection using a standard cup and 3D printed guides (PSI) for cup position

The Story
“A 75-year-old male presented with a painful right hip due to a chronic infection of a right total hip replacement implanted in 1990. He had a left total hip replacement in 1997.
His past medical history includes septic arthritis in both knees leading to knee pain, atrial fibrillation and transient ischaemia.”
The Investigation
The patient walked with one stick. In clinic he was Trendelenburg negative and had a reasonable range of motion in both of his hips, however movement caused significant pain in his right hip.
He had an ESR of 118mm/H and a white cell count of 8x10^9 per litre. There was no CRP. These raised inflammatory markers indicated the need for a right hip aspiration which grew Rifampicin resistant staphylococcus aureus.
The Evidence

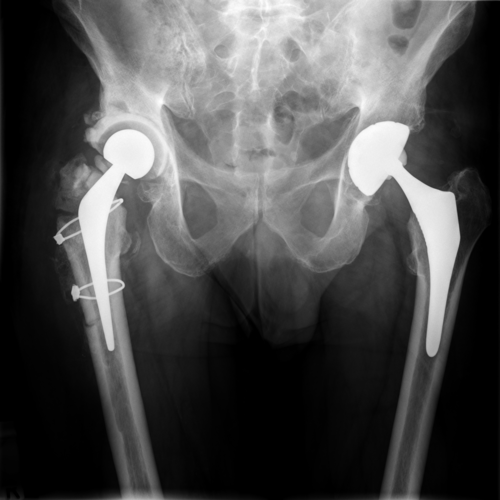
Pre-operative anteroposterior (AP) radiograph of the patient’s pelvis demonstrating bilateral hip replacements. On the right side there is significant bone loss of the proximal femur and greater trochanter. Osteolysis is also present around the uncemented acetabulum and its screws. There is eccentric wear of the polyethylene liner.
The Diagnosis
The diagnosis was chronic infection of right total hip replacement with significant osteolysis and possible polyethylene particle disease.
The Plan - First Stage
This patient underwent a two stage revision for an infected right total hip replacement.
In the first stage, the existing metal work was removed, the wound washed and a temporary spacer implanted.
Stage One Outcome
Post-operative AP radiograph from the first stage of this patient’s revision..

Post-operative scannogram from the first stage of the revision. This is a summary of the CT that was used by the PSI company to plan the surgery and design the patient specific instruments.
The Plan - First Stage
The second stage used PSI to help the surgeon obtain the optimal position for the femoral cup.
To do this, a pre-operative CT scan was sent to a commercial PSI company to plan the procedure and produce a patient specific acetabular jig and 3D model for intraoperative use.
The acetabular jig guides two pins into the acetabulum, over which a 3D printed bar slides providing visual guidance to the surgeon to obtain the optimum trajectory of reaming and implantation of the acetabular component.

Photo of a PSI acetabular jig sat in a 3D printed model of the patient’s acetabulum. The jig is custom made to fit into the patient’s own acetabulum. The left hand arrow shows the points where the jig is complimentary to the patient’s anatomy to get an exact fit. The right hand arrow shows the drilling guide. When the jig is sat correctly in the patient’s acetabulum, the drilling guide is used to place two pins onto the pelvic bone. A visual guide (pictured right) is then slid over these pins and aids the surgeon in getting the reaming angle correct.


Three photos showing the intraoperative use of the acetabular jig.
Image one demonstrates the acetabular model and jig being used to visualise the positioning of the jig within the acetabulum. Pins are then drilled into the acetabular bone using this jig.
Image two shows the visual guidance bar being slid over the two precisely positioned pins.
Image three shows the surgeon lining the trajectory of the cup with the visual guidance bar to ensure optimal positioning.
Stage Two Outcome

This is a post-operative AP radiograph from the second stage of this patient’s revision surgery.
The Verdict
PSI is not only for primary operations; it can be used to aid revision procedures.
3D CT planning of complex cases is essential.