CASE 25: Revision surgery using custom 3D-printed trabecular titanium implants, for a patient with rheumatoid arthritis

The Story
“William was 61 when we first met. He presented with a painful, dislocating right hip replacement. His rheumatoid arthritis destroyed many of his joints. He had a right hip replacement in 1995 which functioned well until 2006. He then experienced increasing pain until he developed recurrent dislocation and inability to walk in 2016.”
The Investigation
Examination revealed an inability to walk, a leg length discrepancy of 8cm, no neurological deficit and no skin ulcers.
Blood inflammatory markers were normal.
The Evidence

Anteroposterior plain radiograph showed massive acetabular bone loss, proximal migration of the cup, erosion of the ilium by the femoral head and suspected loosening of the femoral stem.

3D reconstruction of the acetabular defect of this patient. Software was used to generate this model from his pre-operative CT scan. The 3D model makes it easier to visualise the extent of this patients large Paprosky 3B defect.

3D model of the patients right hemipelvis. This demonstrates the scale of the acetabular defect. It has been 3D printed and then sterilised for intraoperative use.
The Diagnosis
Severe acetabular defect classified as a Paprosky 3B.
Requires a custom acetabular implant because all other steps on the ladder of reconstruction are unlikely to work.
The Plan
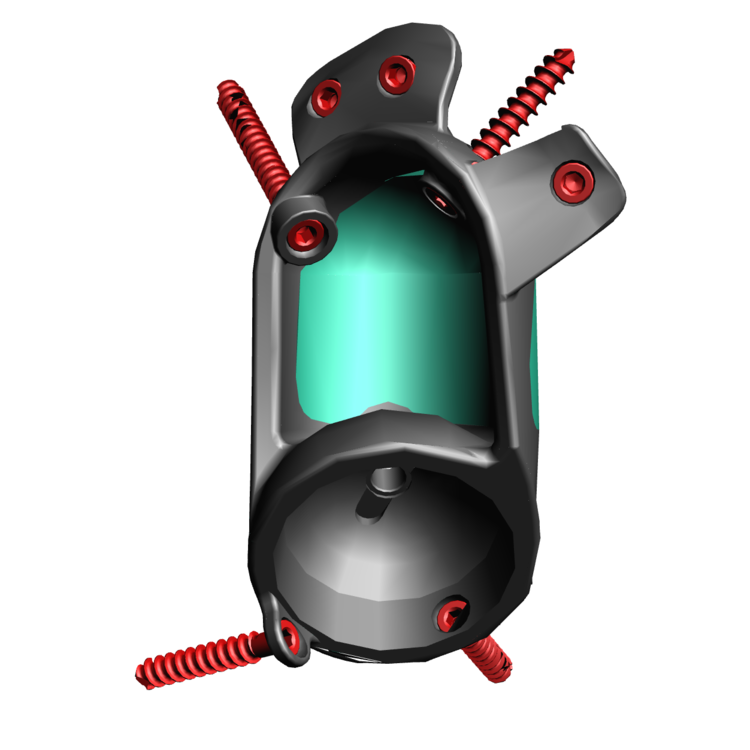
Implant design - This image demonstrates the design of the custom implant, with the green highlighting areas that will be produced from trabecular titanium to encourage bone growth for implant fixation. It is designed using the 3D reconstruction of the patient's pelvis to be complementary to the patient's own defect.
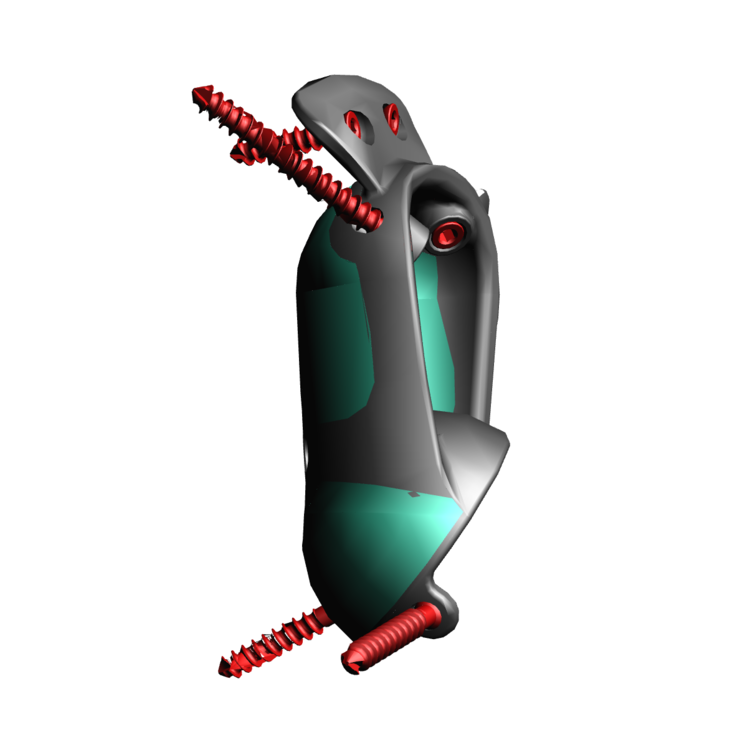
Implant design - This image demonstrates the design of the custom implant, with the green highlighting areas that will be produced from trabecular titanium to encourage bone growth for implant fixation. It is designed using the 3D reconstruction of the patient's pelvis to be complementary to the patient's own defect.

Implant in situ - This image demonstrates the design of the custom implant sat within a computer generated 3D model of the hemipelvis produced from a pre-operative CT.

Trabecular Titanium used with these implants. In order to manufacture this structure, rapid prototyping, better known as 3D printing is utilised. This is made using electron beam sintering, which means the structure is continuous. The pores within the material have been shown to encourage bony ingrowth.

3D printed model of the hemipelvis with a 3D printed plastic prototype of the implant placed within the defect. Both are sterilised and used intraoperatively to help the surgeon picture the defect.

3D printed model of the hemipelvis, prototype implant and drill guides. The drill guides are sterilised and used intraoperatively to help guide the trajectory of the screws.
The Operation
Key surgical steps
Posterior approach to allow extensile exposure of acetabulum and femur.
Release of psoas and gluteus maximus from the femur, and abductors from the ilium.
Bone preparation with reamers according to 3D computer plan and checking using sterilised plastic 3D-printed models of the acetabular pre and post bony preparation.
3D printed trabecular titanium implant secured with at least 3 good screws.
Dual mobility bearings 44mm.
Cement-in-cement, small sized stem to allow for adjustment of offset and leg length.
Wash.
The Outcome

Anteroposterior plain radiograph showing the custom made Trabecular Titanium implant in situ within the pelvis, held in with three screws achieving a good initial fixation. The new stem has been cemented into the existing cement mantle. Note that only three of the seven planned screws were used.

3D reconstruction produced from the post-operative CT scan. The opacity of the pelvis has been reduced to highlight the custom implant and femoral stem.
The Verdict
“At one year post-op, William was very pleased with the outcome of the surgery. He walks with a crutch. His hip movements were painless and he was able to flex up to 40 degrees (passively to 80) and abduct to 20 degrees.”
In order to perform such a large reconstruction:
Meticulous pre-operative planning is required.
Extensive surgical exposure is required.
Close post operative monitoring is needed.
-
One of the main challenges in managing massive acetabular defects in revision hip arthroplasty is the restoration of the biomechanics of the joint, which is also the fundamental purpose of this surgical procedure.
Leg length (LL) discrepancy causes clinically relevant issues including: implant loosening; gait and posture abnormalities, including scoliosis and spinal deformities; osteoarthritis in other joints and sciatic nerve damage. Approximately 5cm of lengthening during surgery is the maximum safe correction to avoid sciatic nerve damage. In cases of massive acetabular defects, LL disparity and hip centre of rotation (COR) displacement can be present, often exceeding the 5cm limit and risking neurological damage if fully corrected.
-
-
For our other cases on reconstruction of massive acetabular defects using 3D printed custom acetabular implants, look through all of the cases under CT Planning - 3D printing on the acetabular reconstruction home page: